1.Download and install MySQL server
2.Run MySQL server
3.Run NetBeans
4.Connect MySQL with NetBeans
5.Edit database in Net Beans MySQL editor
1.Download and install MySQL server
First step is easy and simple ,just download MySQL server from http://dev.mysql.com/downloads/mysql/ as per your system platform (e.g. 32-bit or 64-bit or mac or Ubuntu ) and install.After installation you have to configure MySQL server,leave all as default ,you just set password.
2.Run MySQL server

 Now for test run installed MySQL server console(command line client ).Enter password and you will see welcome secren.Type " SHOW databases; " as command which give output of table of inbuilt databases and table name is Databases.
3.Run NetBeans
You can download latest version of Net Beans from the official website http://netbeans.org/ .Install , if not, then run the application.
4.Connect MySQL with NetBeans
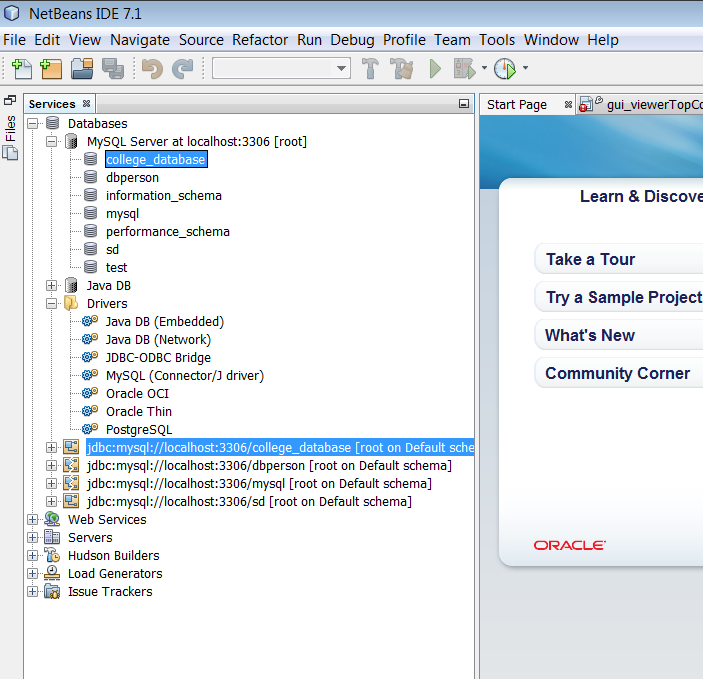
From Menu bar open windows>services.You have ,now, all inbuilt services showing on left panel.In order to connect MySQL you need connector driver.Actually for any external databases connections like oracle,mysql,microsoft access and other ,you need their respective connector.
But Net-beans has built in driver for mysql so it is easy.You can see drivers in database node in servieces panel.


You should start connection of database with mysql by right-click MySQL server local host:3306[root] node and click start .Then as sub node it show all database that were shown in mysql command line client before
Create Database from " MySQL server local host:3306[root]" and give it name(e.g. college_database).Then a database with this name is created at the end of Databases node and listed in "MySQL server local host:3306[root] node". So you are connected to mysql database with new database created.
Next time when you try run database ,you may need to reconnect to mysql server.For this right click MySQL Server at local host:3306[root] and jdbc:mysql://localhost:3306/college_database[root on Default]
5.Edit database in Net Beans MySQL editor
Expand node created below where all databases are listed out.Expand your newly created database(mine college_database).You will see theree nodes Tables,Views and Procedures.In order to create table right click table and select Create Table.A window will pop-up where you name table and add column for database field like name,address,contact etc.A table must have one primary key.
Now you can view table by right-click the table title and select view data.So you will be shown a table with your column of fields.In order to insert data select Insert Record [Alt+I] which is at top left corner of the table or you can use command in SQL editor as shown below.


2.Run MySQL server
3.Run NetBeans
4.Connect MySQL with NetBeans
5.Edit database in Net Beans MySQL editor
1.Download and install MySQL server
First step is easy and simple ,just download MySQL server from http://dev.mysql.com/downloads/mysql/ as per your system platform (e.g. 32-bit or 64-bit or mac or Ubuntu ) and install.After installation you have to configure MySQL server,leave all as default ,you just set password.
2.Run MySQL server


3.Run NetBeans
You can download latest version of Net Beans from the official website http://netbeans.org/ .Install , if not, then run the application.
4.Connect MySQL with NetBeans
From Menu bar open windows>services.You have ,now, all inbuilt services showing on left panel.In order to connect MySQL you need connector driver.Actually for any external databases connections like oracle,mysql,microsoft access and other ,you need their respective connector.
But Net-beans has built in driver for mysql so it is easy.You can see drivers in database node in servieces panel.

You should start connection of database with mysql by right-click MySQL server local host:3306[root] node and click start .Then as sub node it show all database that were shown in mysql command line client before
Create Database from " MySQL server local host:3306[root]" and give it name(e.g. college_database).Then a database with this name is created at the end of Databases node and listed in "MySQL server local host:3306[root] node". So you are connected to mysql database with new database created.
Next time when you try run database ,you may need to reconnect to mysql server.For this right click MySQL Server at local host:3306[root] and jdbc:mysql://localhost:3306/college_database[root on Default]
5.Edit database in Net Beans MySQL editor
Expand node created below where all databases are listed out.Expand your newly created database(mine college_database).You will see theree nodes Tables,Views and Procedures.In order to create table right click table and select Create Table.A window will pop-up where you name table and add column for database field like name,address,contact etc.A table must have one primary key.
Now you can view table by right-click the table title and select view data.So you will be shown a table with your column of fields.In order to insert data select Insert Record [Alt+I] which is at top left corner of the table or you can use command in SQL editor as shown below.


No comments:
Post a Comment